How to Convert an Expired JAR Licence to an EASA Licence
(Updated on 22nd March 2021)
EASA Licence Conversion
Now that the EASA regulations have been fully implemented, I am getting enquiries from worried pilots who have let both their helicopter type rating and their licence expire. The old JAR licence needed to be renewed every 5 years. The new EASA Licence (more correctly referred to as a PART-FCL licence) has no expiry date.
The literature relating to renewing an expired licence is difficult to find in the Part-FCL document but after trawling through the relevant documents and with some help from Simon White in the IAA, I was able to get the correct information.
First of all, there is no need to panic or worry if your old JAR licence has expired. It is a relatively simple process to renew it. Anyone wishing to renew an expired JAR license to EASA license should ensure that they do the following:
- Have a current Class 1 or Class 2 medical certificate
- Have passed the English Language Proficiency (ELP) test and reached a level of at least level 4.
- Complete the requirements to renew any helicopter type rating (a licence cannot be issued without a type rating). Refer to my previous post “Renewing an Expired EASA Type Rating“
- In Ireland – complete the application form www.iaa.ie/media/ApplicationfortheRe-Issue1.pdf
- Pass the oral and flight skill test
On successful completion of the above, the Authority (IAA in Ireland) will issue an EASA Licence.
Note that there is no longer a requirement for a Type Rating written exam. The examiner will test applicants verbally before the flight test. You will still be required to have the necessary technical knowledge before the examiner will issue a pass.
Helicopter Stability
(Updated on 19th March 2021)
Stability
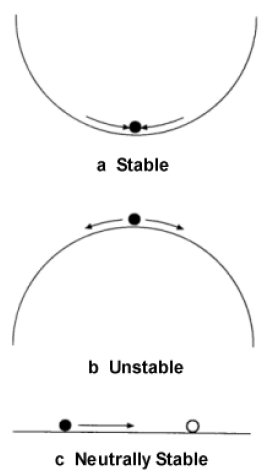
Stability can be simply classified as static stability or dynamic stability.
- Static Stability. If an object is disturbed from a given position and following this disturbance it tends to return to this position of its own accord, it is said to be statically stable. If, following the disturbance, it continues to move further and further away from its original position, it is said to be statically unstable; if it remains in the disturbed position, it is said to be statically neutrally stable.
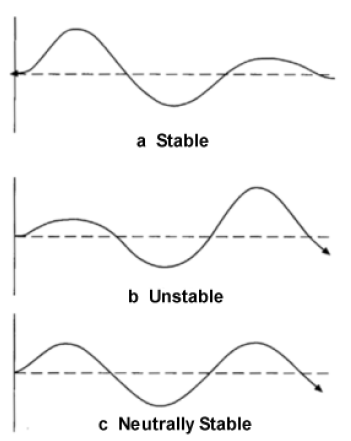
- Dynamic Stability. If an object is statically stable it will return to its original position, but in doing so, it may initially overshoot. If the amplitude of the oscillations decreases and dies out, it is said to be dynamically stable. If the amplitude of the oscillations increases, then it is said to be dynamically unstable, and if the oscillations continue, but at a constant amplitude, it is said to be dynamically neutrally stable.
Stability in the Hover
Consider a helicopter hovering in still air when a gust of wind affects the rotor disc from the side. The disc will flap away from the wind and, if no corrective action is taken by the pilot, the helicopter will move away from the gust. After a short while the gust of wind dies out but, because the helicopter is moving sideways, it will now experience an airflow coming from the opposite direction. The helicopter will now slow down as the disc begins to flap away from this new airflow; in addition, the fuselage will tend to follow through as an overswing, thereby tilting the disc further than it was tilted before, and the helicopter will move sideways back towards its original position faster than it originally moved away. The movement of the helicopter will
result in it experiencing continual sideways changes in the airflow affecting the disc and, although it will be statically stable, because the amplitude of the oscillations will be continually increasing, it will be dynamically unstable. The effect of a gust of wind from any direction will produce the same effect on the disc, therefore the helicopter is dynamically unstable in the pitching and rolling planes.
A gust of wind will also affect the tail rotor. If for example the helicopter has a starboard mounted rotor and is struck by a gust from the starboard side the tail rotor’s angle of attack will decrease. Assisted by the weathercock action of the fuselage, the helicopter will then yaw into the gust, ie to starboard. The aircraft will also move away from the gust and in so doing it will reduce the effect of the gust on the tail rotor. The aircraft will then experience an airflow from its own sideways movement and the aircraft will yaw to port. Following the movement of the helicopter it can be seen that the fuselage will be alternately yawing to port and starboard with each successive sideways movement of the helicopter. Therefore, when hovering, the helicopter is statically stable but dynamically unstable in the yawing plane.
Stability in Forward Flight
If a gust of wind from the starboard side strikes the fuselage of a helicopter with a starboard mounted tail rotor in forward flight, the immediate effect is for the tail rotor’s angle of attack to decrease and the helicopter to yaw to starboard. But the inertia of the helicopter will continue to keep it on its original flight path; weathercock action will then return the fuselage to its original position. In forward flight, therefore, the helicopter is both statically and dynamically stable in the yawing plane.
If a gust of wind affects the disc from ahead, the disc will flap back, and forward thrust will reduce and the aircraft will decelerate. Because the centre of gravity is below the thrust line, the inertia of the fuselage will cause the aircraft to pitch nose up, taking the disc back further and thus decreasing speed even more. When the speed has stabilised at a lower figure, the fuselage will start to pitch down below its original position (pendulosity): at the same time the disc will flap forward relative to the fuselage (reduced flap back due to lower speed). Now the speed will start to increase with the helicopter descending in a shallow dive and, as the speed increases, the disc will begin to flap back again and the cycle will be repeated, but with increasing amplitude. The helicopter will finally be pitching outside control limits unless cyclic correction is applied early in the cycle. The helicopter is, therefore, statically stable because each oscillation will take it through its original position, but is dynamically unstable because the amplitude of the oscillations progressively increases.
Stability Aids
Tail Stabiliser
One method of improving stability in forward flight is by fitting a stabiliser at the tail of the fuselage. Its purpose is to help prevent the fuselage from following through when a gust of wind causes the disc to flap back. As the fuselage begins to pitch up, the increasing angle of attack on the stabiliser will damp down the movement and the rearward tilt of the disc will be greatly reduced; the reverse effect takes place when the fuselage pitches down. It should be noted, however, that the stabiliser will produce adverse effects if the helicopter is moving backwards: following a gust of wind which causes the disc to flap forward, the fuselage will pitch nose down and the tail will pitch up; this will increase the lifting force on the stabiliser, thereby increasing the pitch-up movement of the tail to a dangerous degree.
The Autostabiliser
The autostabiliser, is the simplest form of control system. The autostabiliser is a damping device without the ability to hold a given datum, hence a helicopter autopilot often consists of an autostabiliser to which long term datum holding is added. There are two types of autopilot which may be fitted to helicopters:
-
- Basic Autopilot. A basic autopilot provides long term datum holding of one or more variables but does not permit the pilot to introduce demands through his controls. Trimmers may be used to make limited adjustments.
- Directed Autopilot. A directed autopilot provides long term datum holding of one or more variables and also permits the pilot to introduce demands through his controls. Such an autopilot is also described as an Attitude Manoeuvre Demand System and may also be called Automatic Stabilisation Equipment.
Summary
As you can see, helicopter stability is not a simple topic but in general, helicopters are statically stable and dynamically unstable.
The helicopter is statically stable because each oscillation will take it through its original position, but it is dynamically unstable because the amplitude of the oscillations progressively increases.
For really technical information you can try reading this: http://www.aerojockey.com/papers/helicopter/report.html
EC 120 Colibri Book
(Reviewed on 24th October 2021)
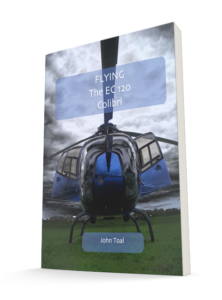
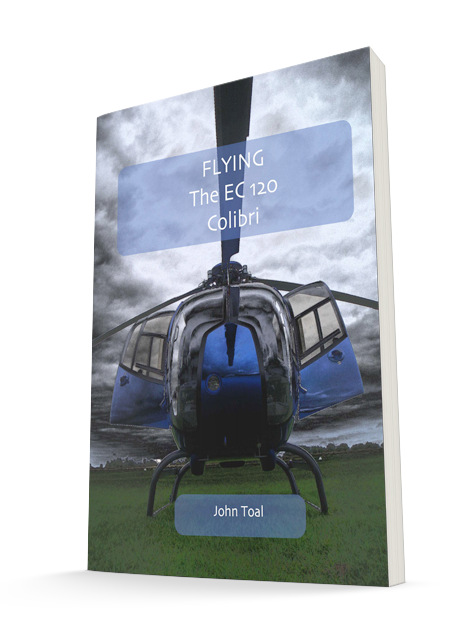
I have just completed a new book for anyone training on the Eurocopter EC120 Colibri Helicopter. This is a training manual that describes all of the systems in detail. There are numerous diagrams in this 2nd edition black and white book.
The original (full colour) version of this book is also available on Amazon but it is more expensive. The colour does make the diagrams clearer and easier to read.
Details can be found on the Amazon website or on the link below.
As we are not normally allowed to take the Pilot’s Operating Handbook home with us, this book is invaluable for all trainees and pilots.
Edition 1 was an expensive book. For this reason, edition 2 has been published in black and white and is much more affordable. Much of what is in the POH is in this book but there is a lot more too. Let me know what you think.
The Finer Points Of Autorotations
(Reviewed on 18th March 2021)
Introduction
Qualified pilots can all do autorotations. Low time pilots can do them but are a little nervous and tentative. Students enjoy doing the autorotations but wonder what it would really be like if they had to do one for real.
The only people I know who are really good at autorotations are flight instructors. They do them every day so they get lots of practice.
My question is – how can we make the autorotation process easier for students?
Assumptions
You should be comfortable with smoothly entering an autorotation by lowering the collective and using aft cyclic while looking ahead.
Bringing the airspeed back to the autorotation speed for your helicopter type.
Controlling the rotor RPM (especially during turns).
Sequence of Events
When you do an autorotation there is a sequence of events that should happen in order for the autorotation to be successful.
- Enter the autorotation
- Establish steady glide at autorotation speed and steady RRPM
- Determine wind direction
- Select a suitable landing area
- Determine which technique you are going to use to reach the landing area
- Mayday call
- Flare
- Land
As we have already assumed that you can enter an autorotation and control your speed and RRPM, we will concentrate on the remaining items.
Determine Wind Direction
We should always be aware of what direction the wind is blowing from – just in case we have to do an emergency landing. This is covered in detail in an earlier post so I will not elaborate further on this subject.
Select a suitable landing area
The best way to select a landing area is to look all around you. Look for the biggest field or landing area close to the helicopter. Do not try to go for distance on this one as it is much, much easier to lose height than it is to gain distance.
Don’t worry if there are cables in the landing area – you can avoid these if you can see them so do not let cables prevent you from using a particular area.
It does not matter if the landing area is on the left or right.
Determine which technique you are going to use to reach the landing area
Now that you have selected a landing area, you can work out what technique you are going to use to reach the area.
- Normal autorotation
- Range autorotation
- Extended range autorotation
- Zero speed autorotation
- “S” turns
- 360 degree turns
Whatever technique you use, try to stay relaxed. You will be descending but you are still flying.
- Wind From Ahead
If the wind is on your nose then all you need to do is determine if you are going to overshoot. If the landing area appears to be moving down the windscreen then you are going to overshoot. Use “S” turns or reduce speed to lose height.
If it remains in the same position on the windscreen then you are going directly to the landing area.
If the landing area appears to be moving up the windscreen during the descent then you will land short. Increase speed to gain distance. - Wind From 3 o’Clock or 9 o’Clock
When the wind is from the side, then you need to decide when to turn into the landing area.
Treat this as part of a circuit. You need to decide when to turn on final – do not leave it too late otherwise you will not reach the landing area.
The rest of the procedure is as described in 1 above. - Wind From Behind
Treat this as the downwind leg of a circuit. Do not wait too long before turning. You need to decide when to turn on base – do not leave it too late otherwise you will not reach the landing area. Turn on base and then decide when to turn on final.
The rest of the procedure is as described in 1 above.
Mayday call
Do not stress over the mayday call. You will not be remembered for getting a great mayday call out if you subsequently crash – Fly the aircraft. Only if you have time and the conditions are right should you do a mayday call. Mayday calls get easier with practice so make sure you practice them and then you can do them quickly.
E.g. “Mayday Mayday Mayday.
ABC Approach. EI-DEF
Engine failure 4 miles northwest of Athlone
Forced Landing”
If you can get the above information out before you lose too much altitude then you are doing well. You can give extra information if you like but it is important to not get sidetracked or distracted. Practice this while driving to improve multitasking.
Flare
The flare is described in detail in a previous post on autorotations.
Land
The autorotative landing is described in detail in a previous post on autorotations.
Summary
It really is a case of practice makes perfect. Treat the approach like you would a circuit. Do your turns early rather than late. If you turn late then you increase your chances of landing short. If you turn early you have the option of doing further “S” turns to lose height.
Note the position of the landing area on your windscreen when you practice autorotation so that you have a good idea what your glide angle is for your helicopter type.


