


Simplified EASA Regulations

EASA Regulations
(Updated on 5th April 2021)
Everyone flying in Europe is familiar with the new EASA regulations. However, students, new pilots and pilots outside of Europe may find all these regulations confusing and the information they need, hard to find. The Basic Regulation is called Regulation (EC) No 216/2008. This regulation contains all the information and regulations relating to everything in aviation in Europe. It is a very large document and is supported by numerous other documents.
Nothing is ever duplicated in these regulations. The documents are very difficult to read and it is easy to miss an important piece of information.
Every week I get requests from all over the world from qualified pilots trying to find the information on how to convert their ICAO licence to an EASA licence. Much of the information you need can be found on this website.
But if you need more information about how to get an EASA licence or how to convert your FAA licence to an EASA licence or how to convert your ICAO licence to an EASA license, you can find all of this information in my book “So You Want To Get An EASA Pilot Licence“. This book is available on Kindle only. To read it, you must have a Kindle e Reader or have the Kindle app installed on your computer or your device.
The book has 59 pages and it describes in plain language, what is required to obtain (or convert to) the following types of licence:
- LAPL(A) – Light Aircraft Pilot Licence (Aeroplanes)
- LAPL(H) – Light Aircraft Pilot Licence (Helicopters)
- LAPL(S) – Light Aircraft Pilot Licence (Sailplanes)
- LAPL(B) – Light Aircraft Pilot Licence (Balloons)
- SPL – Sailplane Pilot Licence
- BPL – Balloon Pilot Licence
- PPL(A) – Private Pilot Licence (Aeroplanes)
- PPL(H) – Private Pilot Licence (Helicopters)
- PPL(As) – Private Pilot Licence (Airships)
- CPL(A) – Commercial Pilot Licence (Aeroplanes)
- CPL(H) – Commercial Pilot Licence (Helicopters)
- CPL(As) – Commercial Pilot Licence (Airships)
- ATPL(A) – Airline Transport Pilot Licence (Aeroplanes)
- ATPL(H) – Airline Transport Pilot Licence (Helicopters)
This book is priced at $1.99 and like all my books there will be special offers where large discounts can be found.
Confined Areas

(Updated on 5th April 2021)
What is a Confined Area?
Helicopters are designed to let us land in car parks, mountain tops, ships and any number of other unusual locations. For the purposes of this post, any area that is not an airport is considered a confined area. You may be landing in a 40 acre field – but if you do not follow a proper confined area procedure, there is an increased safety risk.
By learning the procedure for flying confined area approaches and take-offs, you will reduce the risk of anything going wrong by a substantial amount. This post will take you through the procedures for confined area operations.
This exercise is taught towards the end of your PPL training. The reason for this is that you need to be comfortable with flying the helicopter. This frees up your brain to think about other things. You need to be able to think ahead, plan ahead and anticipate what is coming up. You must be able to fly accurately. When you are relaxed and comfortable flying the helicopter, all of these things become easier to do.
Procedure
Once we learn a procedure then we ensure that we do the same things, in the correct order, each time. The procedure reduces the risk of us forgetting something. By using the procedure each time, then the confined area approach, landing, take-off and departure become safer.
The confined area LANDING procedure involves the following steps:
- Power check
- Reconnaissance
- Approach
- Landing
The confined area TAKE-OFF procedure involves the following steps:
- Power check
- Take-off
- Departure
Landing
Power Check
Before landing, it is vital that we perform a power check. We need to know if the helicopter can produce enough power to land or take-off safely. In my opinion, if you do not have enough power to hover (out of ground effect) then (as a low time pilot) you should not attempt to land in this area – instead, find an area where you can perform a normal approach to land.
The power check is described in detail in a previous post Power Checks.
Reconnaissance
The purpose of the reconnaissance is to let you survey the area where you are going to land. The reconnaissance will alert you to hazards, layout of the land, wind etc. This will also determine how you will do your approach. There are five main items to consider during the reconnaissance:
- Size
- Shape
- Surrounds
- Slope
- Surface
Fly the reconnaissance at 60kts (but no less than 50 knots) and 500 feet above ground level (AGL). A common mistake is to arrive at the area still doing 100 knots and this will severely reduce your time over the target and increase your workload. Fly around the area as many times as required.
If you are piloting from the right seat it is advisable to fly around the area in a clockwise direction as this makes it easier to see everything from your side window.
Size
Is the landing area physically large enough to do an approach and land the helicopter?
Shape
Is the shape suitable for making an approach? A narrow field that is parallel to the wind direction will be easy to make an approach to but if the same field has the wind blowing across it, then it may be inadvisable to land there.
Surrounds
Take a note of the surroundings. Some of the things to look for are:
- Trees on the approach and departure
- Buildings in the vicinity
- Animals – especially horses
- Electricity poles or pylons
- Cables
- Lead-in and lead-out markers
- Wind direction (described in wind direction)
It is important to choose a lead-in and lead-out marker. These are prominent and visible markers on the ground that you will be able to see from a long distance away. When you turn on final to land, you will be able to see these markers. When the markers are lined up, you will be able to fly a straight line to your landing site, even though the landing site may be in a valley and not visible at first until you get closer to it. The lead-in and lead-out markers should be pretty much pointing into wind and you must take this into account when choosing them.
When looking for animals, do not only look in the field where you are going to land. Look at the surrounding fields also. You should not attempt to land if there are horses nearby. Horses are easily spooked and some horses can be valued at more than your helicopter. You will have to use judgement when there are animals nearby.
Buildings and trees may require you to alter your approach path. Do not fly directly over the top of anyone’s house.
Cables are notoriously difficult to see. I have flown into areas where I know there are cables and I can see the poles supporting them. But under certain light conditions, these cables become invisible. They blend into the environment. Great care is needed. Look for the poles. Bear in mind that poles are often located in hedges and can be difficult to see. If you see poles, you should always assume that there are cables between them. As long as you can keep a safe distance between the helicopter and the cables, then there is no problem.
Slope
The slope should be continuously assessed during the approach. It will be difficult to see any degree of slope while you are flying at 500 feet. You will need a fairly level area to land on.
Surface
There are many different types of surface that we can land on. Some are listed below:
- Asphalt
- Concrete
- Gravel
- Short grass
- Long grass
- Ploughed
- Rocky
- Sand
- Snow
- Ice
- Wet or marshy land
Take into account the hazards associated with landing on each of these surfaces.
Approach
Once you have completed the reconnaissance, you can now fly to set yourself up for the approach. Keep flying at 60 knots and maintain approximately 500 feet AGL.
Fly as if you are flying a circuit pattern at an aerodrome. Set yourself up for a crosswind leg, a downwind leg and base leg before turning on final approach at 60 knots. Use the lead-in and lead-out markers to help you locate your turning point for final. If your helicopter is equipped with carburetor heat, it should be selected fully hot on the downwind leg.
Once you turn onto final approach, reduce your speed to 50 knots. Fly straight and level at 50 knots and 500 feet AGL until you see a sight picture for landing. Perform the approach and aim to pass at least 20 feet over any trees or obstacles close to the confined area. Keep an eye on the vertical speed indicator to avoid the risk of vortex ring developing.
Double Angle Approach
Most confined area approaches will not permit you to fly a normal approach. Sometimes you will start off flying a normal approach but as you get closer, you will fly a steeper approach angle. This is called a double angle approach.
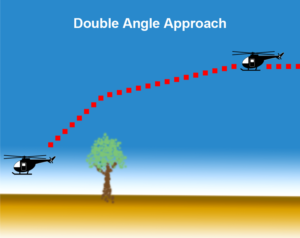
You may wish to fly a ‘Dummy’ approach to assess flight paths, reassess obstacles and hazards and to assess power requirements. This ‘Dummy’ approach will be terminated at a safe height and a climb to normal reconnaissance height will be made before performing the actual approach and landing.
At 300 feet AGL, start to reduce speed. Do not let the indicated airspeed go less than 30 knots until the rate of descent is less than 300 feet per minute.
At 200 feet AGL carburetor is selected fully cold and you must either commit to land or go-around.
At 100 feet AGL, ignore the sight picture and ensure the helicopter is moving forward and down. If you are passing over any tall objects, be aware that the tail rotor must also clear these obstacles.
Ensure that you keep at least 20 feet above any obstacles.
Choose a lateral marker in the landing area. This marker will normally be on your right hand side if you are sitting in the right seat. The purpose of this marker is to let you know when your tail rotor is clear of any obstacles. When the lateral marker is on your 3 o’clock position, it is safe to descend without the tail rotor coming into contact with any obstacles.
Landing
Come to a high hover (10 to 15 feet skid height). Perform a clearing turn to ensure that you are not landing on top of a concealed hazard or obstacle e.g. tree stumps, fence posts etc. It is a good idea to use a turn about the tail. This will ensure that the tail rotor does not move into an unseen object. But if you are not comfortable flying a turn while maintaining the tail over one spot, use sideways flight to clear the area before landing.
Use the sloped ground technique for landing.
If there is long grass, try to use the helicopter downwash to flatten it. This will help you see any rocks or tree stumps that may have been hidden.
Vertical Descent
Some confined areas are so small that even a double angle approach is not practical. In this case you must aim to fly a normal approach that brings you directly overhead your landing area and then perform a vertical descent to the landing area. You will be flying inside the avoid curve for a a portion of this approach.
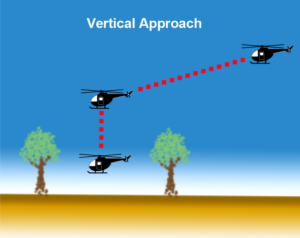
At 300 feet AGL, start to reduce speed. Do not let the indicated airspeed go less than 30 knots until the rate of descent is less than 300 feet per minute.
Use the tops of trees or obstacles (lined up with something further away) to keep a constant angle approach.
At 200 feet AGL carburetor is selected fully cold and you must either commit to land or go-around.
Fly the approach to come to a hover over the landing area. It is possible that you may be coming into a hover at 100 feet AGL or even higher. Make sure you have a lateral marker to alert you if you are moving forward or backwards. It is essential that you do not move forwards or backwards.
Smoothly descend and ensure that the rate of descent does not exceed 300 feet per minute (to avoid vortex ring state). Be aware that once you descend below any obstacle, you will lose the effect of the wind and the helicopter may start to descend faster, requiring more power to slow the rate of descent.
Come to a high hover (10 to 15 feet skid height) and perform a clearing turn before landing.
Use the sloped ground technique for landing.
Take-off
Power Check
Perform the take-off power check while in a low hover. Carburetor heat should be in the off position for the power check. If you do not have sufficient power available to perform a vertical climb out of ground effect, then consider reducing weight. This can be achieved by burning off some fuel or possibly asking a passenger to exit and arrange to pick him/her up in a nearby area where a normal take-off can be performed.
Take-off
Choose a heading and a lateral marker.
Ensure carburetor heat is fully cold and the engine temperatures and pressures are reading normal. Descend until the skids are close to the ground to get the maximum benefit from the ground cushion.
Smoothly raise the collective until the maximum manifold pressure is reached and climb vertically. Do not drift forward or backward. Only when you are above the level of the obstacles in front of you can you start to transition to forward flight. It is important to do this gently. You may get some extra lift from the wind (if there is any) when you clear the obstacles.
Departure
Smoothly accelerate to normal climb speed. Check the temperatures and pressures and make sure to visually check for other traffic in your area.
Practice
Initially, you will practice landing and taking off in relatively large areas but once you become comfortable flying in this environment, your instructor will get you to land in smaller and smaller areas. With practice, the procedure becomes second nature but you must always be aware that complacency can lead to serious mistakes.
As usual – if you can think of anything to add to this post or if you spot any errors, please let me know.
Competency Based Instrument Rating (CBIR)

EASA Instrument Ratings
(Updated on 5th April 2021)
EASA has introduced two new types of Instrument Rating:
- The Competency Based Instrument Rating (CB-IR)
- The En route Instrument Rating (EIR)
These new instrument ratings are designed to make getting an instrument rating much easier to obtain for someone who is not a commercial pilot.
Previously, to get an instrument rating, you had to pass all of the CPL or ATPL theoretical knowledge exams. Not any more. A pilot who holds a PPL can now get an instrument rating by passing a different set of exams. The new CB-IR and EIR now only require pilots to study only the information specific to obtaining an instrument rating. This means a serious reduction in the amount of reading and studying that students are required to do.
The learning objectives are different. It is very difficult to find these learning objectives and so I decided to assemble all of them into one convenient place – my book, “Learning Objectives for the EASA Instrument Rating“.
Anyone studying for the CB-IR or EIR currently has to read the existing CPL or ATPL text books. By using my book, they can now highlight only the sections that are relevant to them. This reduces the amount of reading that they have to do and seriously reduces the amount of study time.
This book is only available on Kindle but if you have the Kindle app, you can still read it. Because it is on Kindle only, I have been able to keep costs to a minimum (less than €2).
You can purchase this book by Clicking Here.
Competency Based Instrument Rating (CB-IR)
The aim of the Competency Based Instrument Rating (CB-IR) course is to teach PPL or CPL licence holders the skills and theory for the Instrument Rating. However this course takes into account your previous instrument flying experience and your previous flight instruction experience.
The CB-IR is ICAO compliant and can be used anywhere in the world.
This qualification will provide you with the skills required to fly under IFR and in IMC.
The theoretical knowledge for this course must be done through an Approved Training Organisation (ATO) and will take a minimum of 80 hours instruction. Some of this instruction may be computer based.
En Route Instrument Rating (EIR)
The aim of the En route Instrument Rating (EIR) course is to teach PPL or CPL licence holders the skills and theory to fly by day under IFR during the en route stage of the flight in aeroplanes. If you hold a night rating, you can also fly the en route stage at night. You cannot fly an Instrument Flight Rules (IFR) approach or departure (or plan to do this) and take-offs and landings must be flown under Visual Flight Rules (VFR).
Unlike the CB-IR, the EIR is not ICAO compliant and cannot be used outside an EASA State.
The theoretical knowledge requirements for this course are identical to the Competency Based Instrument Rating requirements.
Reviews
Reviews are critical to authors and without your reviews, we cannot continue doing the work that we do. If you purchase this book, please consider leaving a review. Thank you.
Getting Promoted

Getting Promoted
(Updated on 5th April 2021)
Here are a few tips for getting promoted and getting better jobs as a helicopter pilot. These tips will work for just about any occupation. If you follow them, your boss will notice you, your colleagues will notice you and your competitors (possibly your future employers) will notice you. All of these things require zero talent. This is not my list. I discovered it on the internet and realized that I already do (or try to do) most of these things. You should too.
- Being on time
- Work ethic
- Effort
- Body language
- Energy
- Attitude
- Passion
- Being Coachable
- Do extra
- Be prepared
Being on Time
If you cannot arrive to work on time then it does not bode well for you arriving at your destination on time. Arriving late always looks bad. Arriving on time is an indication that you have planned your day properly.
Work Ethic
As you get older and become more mature, you will begin to realise that the more you put into something, the more rewards you will receive. A good work ethic is something that is developed over time. You should be prepared to put in the level of work that is required to get the job done. Go the extra mile. You need to be both mentally and physically fit to achieve this. If you want to, your work ethic will improve over time. Keep working at it. Help your colleagues when you get a chance. Do not use them as stepping stones to get you further up the ladder.
Effort
Effort has similarities to work ethic. If you only put in the minimum amount of effort for a particular task, you will only get the minimum rewards. You should try to focus on only one job at a time. People who say they are good at doing multiple tasks (multi-tasking) are actually not doing any of the jobs well. Do one task at a time and do it well.
Body Language
Without meaning to, your body gives a lot of information to others. People can tell if you want to be at work or not. Do some research on body language and see what other people are seeing when they look at you.
Energy
By keeping yourself physically fit, you will have more energy. This means that you must exercise on a regular basis and push yourself to the limits. Having extra energy and the kind of discipline required for your physical training will make you push yourself harder at work and at play. Your stamina will improve and you will find that work is less exhausting. When you are not fatigued, your body language will be good and everything else is a little easier.
Attitude
Having a positive or a negative attitude will affect how you perform or perceive a task or a meeting. If you start with a negative attitude, you will have a negative experience or perceive the meeting as being negative. But if you start with a positive attitude the outcome will normally be more rewarding and worthwhile. Having a positive attitude can also have a positive affect on your body language and the way you communicate to others.
Passion
When you have passion for your job, your job no longer feels like work. Most of us in the aviation industry have a passion for aviation. If you have passion, you will have fun at work. This will affect your work ethic, being on time, work ethic, effort and your body language.
Being Coachable
If you are struggling with something you must be able to ask for help. Someone with more experience can ‘coach’ you. Keeping an open mind and having a willingness to learn is very important in our industry. If you are ‘coachable’ then your skills and knowledge will improve.
Do Extra
If you are prepared to do extra work, you will be noticed. Volunteering to do the work that others shun or avoid will pay dividends. An added benefit is that you will probably be gaining experience on a particular task. Gaining experience is vital to progress your career. Doing extra is closely related to work ethic.
Be Prepared
Being prepared means that you have planned ahead. If there is a possibility that you may have to fly into an unfamiliar airport tomorrow, you can have done a lot of your planning the night before. If you are asked to do the flight, your planning is much easier because you are prepared. This type of preparedness applies to many things and not just flying. If you attend a meeting without being prepared, people will notice.