Visual Cues When Hovering Helicopters
(Reviewed on 1st March 2021)
Visual Cues
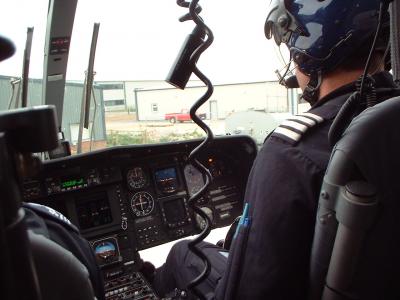
The next time you watch a helicopter take off and lift into the hover and it takes off smoothly and comes to a really steady hover; ask yourself how the pilot is holding everything so steady. The main reason is lots of practice. Good co-ordination and muscle memory definitely make things easier but with the practice he/she has also developed a scan outside that allows him/her to see any movements of the helicopter. The pilot is not fixated on one individual point during the helicopter take off. Instead, he/she will be looking at various points; some close, some far away and some of these points will be in his peripheral vision.
Developing a Scan
When you are learning how to hover a helicopter it is a common mistake to start looking closer to the helicopter and you may soon find yourself fixated on a blade of grass only a few meters from the aircraft. At about this time, your instructor will remind you to look well ahead. But where do you look? Looking close to the helicopter will help you maintain your position but it will not help you overcome the instability of the helicopter. Looking ahead will allow you to hold a steady hover.
As I said earlier, you cannot fixate on one point. You have to develop a scan. How?
The next time you go to the cinema or in front of a large TV, try to note how you watch the action on the large screen. You do not continually move your head. Your head remains stationary while your eyes move. Your eyes are drawn to where the peripheral movement or action is occurring. We can use this type of scan in the helicopter.
Unlike the scan in the cinema, the helicopter scan will not have peripheral movement or action to draw your attention. You are going to have to find objects to look at. Imagine you are sitting in the cinema or in front of a large TV. Look outside and what do you see? Look for things over a wide field of view without moving your head. For example, the wind sock, the control tower, parked aircraft; or further away, hills or identifiable features on the horizon. This scan is not a natural scan like the one you use when watching TV. It has to be developed and this is done through practice. You have to actively look for the objects you are going to scan while hovering.
When you are taking off in a helicopter you need to have your head upright. Make sure your eyes scan from side to side and pick out several of the features you have chosen. These should remain in the same relative position as you take off into a hover.
While you are hovering helicopters, you must continue your scan to keep the features steady. If you can manage to do this, you will end up having a stable hover and you will be doing it with very little effort. Once you have developed your scan, you become a much safer pilot. You now have the ability to come safely to a hover out of ground effect. When navigating on a cross-country trip, you can now hold up a chart and read it while still maintaining your attitude and heading using your peripheral vision.
Each one of your helicopter take offs and landings should be safe and smooth. If you are flying properly, your passengers will think that anyone can fly a helicopter because you make it look so easy and it appears as if you are doing very little. If you do it wrong, your passengers will feel unsafe and will not want to fly with you again. When they say they want to go flying with you again, you will know that you have had a great flight.
Helicopter Night Rating Course
(Updated on 30th August 2020)
Night Rating
After you obtain your Private Pilot’s License PPL(H), you may want to further your skills and train for a night rating. You will not be allowed to fly at night without having completed a night rating course.
EASA Part-FCL tells us what we need to do. Before starting the night qualification course, you must have completed 100 hours of flight time as pilot of helicopters after the issue of your license. You must have at least 60 hours as pilot in command of helicopters and you must also have completed at least 20 hours of cross country flight.
The course must be completed within 6 months so make sure you budget accordingly. The course will involve 5 hours of ground school and 5 hours flying.
The Night Rating Course
The night rating course consists of ground school covering the theory requirements and also the flight portion covering the flying training. The course must be conducted at an Approved Training Organisation (ATO). There is no flight test at the end of the course. On completion of the course the night flying restriction on your pilot’s license will be removed.
THEORY
Theory will take at least 5 hours of instruction. Topics covered are:
- night VMC minima
- rules regarding airspace control at night and facilities available
- rules regarding aerodrome ground/runway/landing site/obstruction lighting
- aircraft navigation lights and collision avoidance rules
- physiological aspects of night vision and orientation
- dangers of disorientation at night
- dangers of weather deterioration at night
- instrument systems/functions and errors
- instrument lighting and emergency cockpit lighting systems
- map marking for use under cockpit lighting
- practical navigation principles
- planning and use of safety altitude
- danger from icing conditions, avoidance and escape manoeuvres
FLYING TRAINING
The flying training is the fun part of the course and consists of 5 hours flying. Of the 5 hours night flying, you will have to complete 5 solo circuits.
The flying training will cover:
- basic manoeuvres when flying by sole reference to instruments
- transitions to instrument flight from visual flight
- recovery from unusual attitudes
- use of radio navigation aids
- use of radar assistance
- night hovering
- night take-off techniques
- night circuit technique
- night approaches
- engine failures at night
- hydraulic control failure at night (if applicable)
- emergency procedures
- night cross country techniques
- night solo circuits
Course Completion
On completion of the night rating course you will be issued with a course completion certificate. The paperwork will be submitted to the relevant Authority of the country where you were issued your license and you will have the night flying restriction removed from your license. For further information you can refer to The EASA Website or at any training school or search on the internet.
New EASA Regulations For PPL
(Reviewed on 25th September 2019)
Introduction
Hi Everyone.
At long last I am back posting again. EASA (European Aviation Safety Agency) is the new regulating authority for Europe. There is a big shake-up in European legislation in relation to flying. These changes are going to affect all of us. All of the changes must be in effect by April 2014.
At the moment I am busy updating our Operations Manual and Training Manual to reflect the changes. JAR-FCL will no longer be the official documentation for describing flying training. The new document will be EASA Part FCL. This is a difficult document to read but I have picked out the relevant parts for the Helicopter PPL.
But don’t get too scared by all of the changes that are coming because most of the changes do not affect helicopters. I will try to put as much information on here as I can think of, but forgive me if I miss anything and if you know of something that I miss in this post, let me know and I will add to it.
JAR-FCL Licenses are no longer being issued. All licenses issued now will be in accordance with EASA Part FCL. Anyone renewing a license or a rating will be issued with a new EASA Part FCL license.
For further information:
PPL Course Pre-entry Requirements
- Minimum age is 15 years old before commencing training.
- Before being admitted for training, the Approved Training Organisation must ensure that all students have sufficient knowledge of Mathematics, Physics and English Language to facilitate an understanding of the theoretical knowledge instruction content of the course.
- Minimum age for solo flight is 16 years old.
- Students must obtain a Class 1 or Class 2 Medical certificate before they can go solo and I would recommend for any student to obtain this BEFORE starting training.
Credit for Previous Experience
Anyone who holds a pilot license for aeroplanes, microlights (with fixed wings and moveable aerodynamic control surfaces acting in all 3 dimensions), microlight helicopters, gyroplanes, gliders, self-sustaining gliders or self-launching gliders may be credited with 10% of their total flight time as pilot in command in such aircraft up to a maximum of 6 hours towards the PPL(H).
Flight Hours
The PPL(H) course consists of a MINIMUM of 45 hours flight time. Of this, 25 hours must be dual instruction time, 5 hours instrument dual instruction and 10 hours supervised solo time. The 10 hours supervised solo time must include 5 hours solo cross country, including a qualifying cross country flight of 100 nm (minimum), with landings at two aerodromes other than the point of departure.
The exercises are numbered as follows:
- Helicopter familiarisation and emergency procedures.
- Preparation for and action after flight.
- Air experience
- Effects of controls
- Power and attitude changes
- Straight and level flight
- Climbing
- Descending
- Turning
- Basic autorotations
- Hovering, Hover taxiing and spot turns, Hovering and taxiing emergencies
- Takeoff and landing
- Transitions from hover to climb and approach to hover
- Circuit approach and landing, Steep and limited power approaches and landings, Emergency procedures
- First solo
- Sideways and backwards hover manouevring
- Spot turns
- Hover (OGE) and vortex ring
- Simulated engine off landings
- Advanced autorotations
- Practice forced landings
- Steep turns
- Transitions
- Quick stops
- Navigation
- Advanced takeoffs, landings and transitions
- Sloping ground
- Limited power
- Confined area operations
- Basic instrument flight
You may notice that the flying syllabus content is still the same as that listed for JAR-FCL2 but the lesson numbering has changed slightly.
Theoretical Knowledge Instruction
The theoretical knowledge subjects are:
- Air law and ATC procedures
- Principles of flight
- Aircraft general knowledge
- Meteorology
- Communications
- Navigation
- Operational procedures
- Flight performance and planning
- Human performance
- General flight safety
Students will have to do a minimum of 100 hours study in a classroom with a ground instructor. However, some Approved Training Organisations (ATO) may be approved to administer some of the 100 hours as a correspondence or distance learning course.
On completion of the theoretical knowledge course, students may attempt the IAA theoretical knowledge (multiple choice) exams.
Already Started Training?
If you have already started training under the old JAR syllabus, there is no need to worry. You have until 8th April 2017 to complete your training otherwise you will have to do the extra theoretical knowledge and flight training necessary meet the EASA regulations.
Converting Licenses from Non-European Countries
Foreign pilots with an equivalent license can convert their license to an EASA license. They should first contact an appropriate Approved Training Organisation (ATO) in the country relevant to where they want to train.
The ATO will do an assessment flight to determine what (if any) extra flight training is required. Foreign pilots will have to pass the written exams relevant to the type of licence they are converting. This will normally involve a certain amount of studying.
The course duration, number of lessons and training hours may be reduced from the published syllabus.
On completion of the written exams and flight training (if required), a foreign pilot will have to pass a License Skills Test (LST) before a license is issued.
Credit for Military Service
Anyone who has had previous military flying experience in Europe, should apply to the Authority of the country in which they flew for credit towards their Part FCL flying.
Conclusion
As you can see from above, the theoretical knowledge training for the PPL(H) has doubled to 100 hours. This is the major change to the syllabus. The flight syllabus is virtually identical but with some minor changes and the lesson numbers have changed. Any new students are automatically training for the EASA license and do not have to worry about anything. Existing students in Ireland who commenced their training before April 2013 have until 8th April 2017 to obtain their PPL otherwise things may start to get complicated.
I hope this helps to clarify some of your questions but feel free to drop me a line any time and if I can help you, I will.
Vortex Ring – Settling With Power
(Reviewed on 18th April 2021)
What is Vortex Ring – Settling With Power?
Vortex ring is commonly called settling with power in the USA. Settling with power is a better descriptive name but vortex ring is technically more correct.
When the helicopter is descending into its own induced flow, there is a risk of vortex ring developing. If the rate of descent is high enough, raising the collective to reduce the rate of descent will make matters worse and the rate of descent will actually increase.
Vortices are always present at the tips of all rotor blades. These vortices can be reduced by good design but they can never be completely eliminated.
Vortices decrease the efficiency of the blades. The outer one third of the main rotor blades produce most of the lift. Losing any lift at the tips due to vortices has a large effect on the total lift generated by the blades.
During vertical descents, the opposing airflow from below changes the relative airflow and the angle of attack of the main rotor blades is increased. Due to washout (blade twist) on the main rotor blades and also the low rotational velocity of the blades close to the hub, the angle of attack is increased so much that this part of the blade starts to stall causing a vibration in the helicopter.
Raising the collective to reduce the rate of descent while the helicopter is in vortex ring has two effects:
- The vortices get bigger and move inboard from the tips of the blades thus reducing lift further and causing the helicopter to descend faster.
- The stalled area of the blades close to the hub starts to move outboard and lift is further reduced causing the helicopter to descend even faster.
Conditions
Do you remember what the conditions are for entry to vortex ring? I have come across quite a few qualified pilots who know how to recover from vortex ring and what it is but they do not know all of the conditions that cause vortex ring. Do you?
To get a helicopter into vortex ring, three elements must be occurring at the same time. These are:
- High rate of descent (> 500 ft./min)
- Low indicated airspeed (< 30 kts)
- Power applied (> 20% of power available)
All three of these elements MUST be present.
Symptoms of Vortex Ring
When vortex ring starts to develop you will have a high rate of descent and a low indicated airspeed. As the inboard part of the rotor blades start to stall, a vibration will be felt throughout the airframe. If you have not already noticed the rate of descent and airspeed, this should make you take notice and give you time to recover.
When it develops further, the vortices from the main rotor tips start to interfere with the efficiency of the tail rotor. This can cause random yawing and it must be controlled by the pedals. The pedal movements can be quite large. Start the recovery as soon as possible.
Recovery From Vortex Ring
The recovery is fairly simple. Lower the collective slightly and use forward cyclic to increase airspeed. When the airspeed reaches 30 kts, vortex ring will no longer be present. Entering autorotation (removing “Power” from the equation) will also stop vortex ring as there will be no induced flow but this is not a practical recovery technique. At some stage the rate of descent must be reduced and if the collective is raised, an induced flow is created. This has the effect of re-establishing the helicopter into the vortex ring state again (probably worse than before).
Vortex Ring Scenarios
Scenario 1 Imagine you have just passed your flight test and you now have a brand new PPL(H) licence. Your friends have helped you celebrate and you have promised Alan a free flight. You brief him and take off to go view his house as he wants to take a few photos. As you approach the house, you slow down to 40kts and hold 500’ AGL.
Alan asks you to slow down so he can get a photo of his wife in the back garden and then he asks you to hold the helicopter steady in the hover. (Everyone knows that all helicopters hover – right). You come back on the cyclic and lower the collective to stop the helicopter climbing.
As the helicopter slows down, it starts to lose translational lift and descend. You have very few visual ques to see this and it goes unnoticed. Then, as the helicopter descends faster you start to feel a vibration and then you notice the high rate of descent.
You naturally raise the collective to reduce the rate of descent but this only makes it worse. If you had altitude you could recover easily like you did during training. There is not enough altitude to recover and you hit the ground hard!
Scenario 2 You are en route from A to B. The weather forecast at A and B is good but you fly into unforeseen bad weather. As the cloud base gets lower you descend to remain clear of cloud (you know how dangerous it is to fly into cloud).
The visibility is deteriorating and you slow down to compensate. You are now following a truck on the motorway below you and you notice that its lights are on. When you slow down further as you are aware of hills in the vicinity. You are now flying at 500’ AGL and 40kts with 1000m visibility. There is so much drizzle and moisture in the air that clouds are forming and dissipating around you. Suddenly a cloud forms just in front of you and you start to lose sight of the truck.
You come back on the cyclic to slow the aircraft down to avoid entering the cloud. Realizing that this is not going to work, you lower the collective to lose altitude. You now have all three conditions for vortex ring and not enough altitude to recover.

