


Weather Limitations for PPLs
One of the questions I get asked over and over is “Do you think the weather is okay for flying?” I always reply “What do you think?” I always want the pilots to try to figure this out for themselves and this always puts the onus back on them.
In the past, I have met pilots who will always rely on other pilots advice on whether to fly or not. When they do this, they invariably are handing control of the flight to someone else. It is vital that you can make this type of decision by yourself.
By the time you get a licence, you should be able to read a TAF and a METAR and get any other relevant meteorological information required for your flight. But how do you actually decide if the weather is suitable for your flight?
There are 4 things to consider:
- Cloudbase
- Visibility
- Wind
- Freezing level
These must be assessed for all legs of your flight and not just your departure and arrival points. Let’s have a look at these in a little more detail and we will make some general rules to help you along.
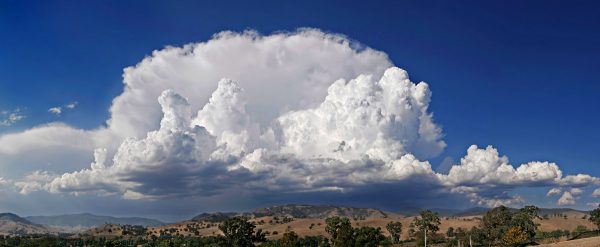
Cloudbase
Cloud base is one of the main factors that will determine if the weather is suitable for flying (for most PPL pilots). Obviously you must not fly closer to the ground than what the regulations in your county permit. In Europe this is 500′ unless you are taking off or landing.
If the cloudbase is less than 500′ AGL then there would be a problem flying in Europe. Special VFR is applicable (in Europe) when the cloudbase is less than 1500′. So don’t expect to get a VFR clearance into class C airspace when the cloudbase is less than 1500′. We should therefore give ourselves some margin to play with.
I use the TAFs and METARs to obtain cloudbase and also other synoptic charts e.g. UK Form 413. I note the cloudbase for the different types of clouds and specifically the SCT (scattered) layer. If you are flying above a layer of scattered clouds and the humidity increases, you may find yourself trapped above a layer of BKN (broken) clouds and unable to see the ground.
During your training, your instructor will have given you guidance as what was a suitable minimum cloudbase to go flying. Solo students will often have a 2000′ minimum cloudbase limitation. As you gain more experience, you will feel comfortable with a lower cloudbase.
You must ensure that you take any high ground en route into account. Do not let high ground force you to exceed your limitations.
For new pilots, I would recommend setting a minimum cloudbase limitation of 1500′ AGL for class G airspace. You must be able to fly 1500′ AGL along the entire route. However in class C airspace, you should set a higher limit.
To achieve this, draw lines on your chart parallel to your track (one line 5nm on either side of your track line). You should take any high ground within this corridor into account and plan accordingly. If necessary, re-plan your route to avoid the high ground.
Visibility
Whenever we send students on solo flights, the visibility must always be greater than 10km. This is a requirement from our operations manual but the minimum visibility may be different at your school.
However, if we limited ourselves to a minimum visibility of 10km then we would rarely be able to fly as the visibility is frequently less than 10km.
So what is a safe flight visibility to use? Well this really depends on your experience and as you get more confidence in flying in reduced visibility, your personal minimum visibility will decrease.
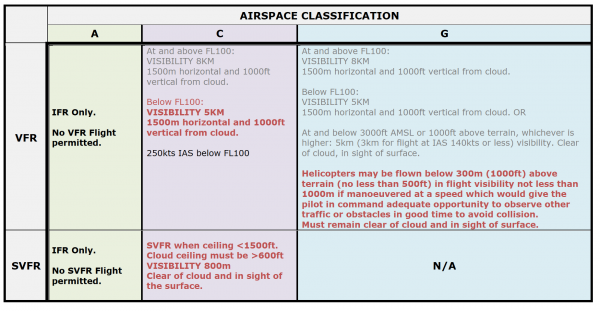
Class G
The EASA regulations state the following – abbreviated for clarity:
- Above FL 100 (in Europe) the minimum flight visibility is 8km
- Below FL 100 (in Europe), the minimum visibility is 5km. Helicopters may be flown down to a visibility of 1000m if flying at a suitable safe speed (as per regulations).
- When flying below 3000′ AMSL or 1000′ AGL (whichever is higher) the minimum flight visibility is 5km – unless you are flying at less than 140kt (then the minimum visibility is 3km).
The visibilities mentioned above are the absolute minimums for VFR flight. Personally, 3km visibility makes navigation extremely difficult and stressful. I would recommend not flying in anything less than 5km until you have some experience and feel very comfortable flying. When you do not have to think too much about the handling of the aircraft, you have a lot more spare capacity to use on navigation, radiotelephony etc.
Class C
The EASA regulations state the following – abbreviated for clarity:
- Above FL 100 (in Europe) the minimum flight visibility is 8km.
- Below FL 100, minimum visibility of 5km.
SVFR exists when the cloudbase is less than 1500′ but is greater than 600′ A special VFR clearance is required in these conditions. You may fly in visibilities as low as 800m but I certainly would not recommend this and you would find this very stressful under VFR. You must remain in sight of the surface at all times.
I have attached a summary of the EASA regulations below. The red text is specific to helicopters.
Wind
Wind is always an important factor and again the maximum wind speed you can fly in will depend on your experience but also the type of aircraft you are flying in.
You must know the wind limitations for your aircraft and for fixed wing pilots, this includes the crosswind limitations. Calculate the crosswind component for the runways you will be using.
Of course you will take note of any high ground that may cause funneling and lead to updraughts and downdraughts and other associated turbulence.
As a PPL you will have experienced windy and gusty flights during your training and you should have a fair idea of what you are comfortable with. As you gain experience, you will become more and more comfortable flying in gusty or windy conditions.
But there comes a time when it becomes uncomfortable to fly in very windy conditions. As a helicopter pilot I think that flying light helicopters when the wind is greater than 25kt or gusts exceed 15kt spreads, it is probably better to stay on the ground.
Ultimately, you will have to decide on what you are comfortable flying in.
Freezing Level
The final thing that you should consider is the freezing level. Helicopters are not permitted to fly in icing conditions. This does not mean that we can’t fly if the temperature is less than 0ºC but it does mean that if the temperature is less than 0ºC you should avoid flying in moisture. Unless you have an instrument rating and a suitably equipped helicopter, you are not permitted to fly in clouds. Helicopters are just too unstable to fly on instruments without the required training and currency on type.
You can certainly fly in freezing conditions but make sure you know the freezing level before you take off and keep a good look out for ice buildup when you are flying above this level.
Conclusion
The weather limitations for flight for PPL pilots will depend on the regulations and to a very real extent, the pilot’s experience. Over time you will fly in varying weather and you will get some scares and hopefully learn from these experiences.
If you are flying in an unfamiliar location, definitely ask the local pilots for their advice about local weather hazards and take their recommendations seriously. They know the intricacies of their locality better than you.
But above all, don’t push the limits. You may get away with it once or twice but if you become complacent, you will get bitten.
Set yourself limits for flying. If the wind and cloudbase exceed these limits, do not go flying. If you are flying and you reach your limits, either divert to an alternate, turn back or (in the case of helicopters) land in a suitable area.
Weather Forecasts
(Reviewed on 4th April 2021)
Terminal Aerodrome Forecast (TAF)
Over the years, I have seen many students struggle with the subject of Meteorology. Meteorology is a very large subject and as a student pilot you will only be learning the basics. We concentrate on what is important to aviation. Weather is such an important factor when flying, that we need to take it seriously and know where to get weather information.
There are numerous sources for weather information and as pilots, we need to try and look at more than one type of information. Some types of information are:
- Synoptic charts
- Significant weather charts
- METARs
- TAFs
- VOLMET
- Satellite images
- Infra red images
- Rainfall radar
For this post, I am going to concentrate on TAFs as many students seem to struggle with decoding them. There are many apps and services online that will decode TAFs for you. However you still need to know how to decode them if you want to pass your flight test and your written exams.
Worked Example 1
TAF EINN 220500Z 2206/2306 31007KT 9999 SCT020 BKN030 BECMG 2206/2208 31012KT TEMPO 2214/2221 31015G26KT=
TAF Decode:
- TAF = Terminal Area Forecast. I.e. this is not a weather report. It is a weather forecast
- 220500Z = Forecast was made on the 22nd day (month is not provided) at 0500hrs (UTC)
- 2206/2306 = The Forecast is valid for the time period from 0600hrs on the 22nd day to 0600hrs on the 23rd day
- 31007KT = Wind is coming from 310 degrees (True) and has a speed of 7 knots
- 9999 = Visibility is greater than 10 kilometers
- SCT020 BKN030 = Clouds are Scattered (2 to 4 oktas) with cloud base at 2000 feet and Broken (5 to 7 oktas) with cloud base at 3000 feet
- BECMG 2206/2208 = Becoming (during the period of 0600hrs to 0800hrs on the 22nd day)
- 31012KT = Wind is coming from 310 degrees (True) at a speed of 12 knots
- TEMPO 2214/2221 = Temporarily between the period of 1400hrs and 2100hrs on the 22nd day. (TEMPO means a temporary variation lasting less than 60 minutes or, if recurring, lasting in total less than half the Trend or TAF period.)
- 31015G26KT = Wind coming from 310 degrees (True) at a speed of 15 knots gusting to 26 knots
Worked Example 2
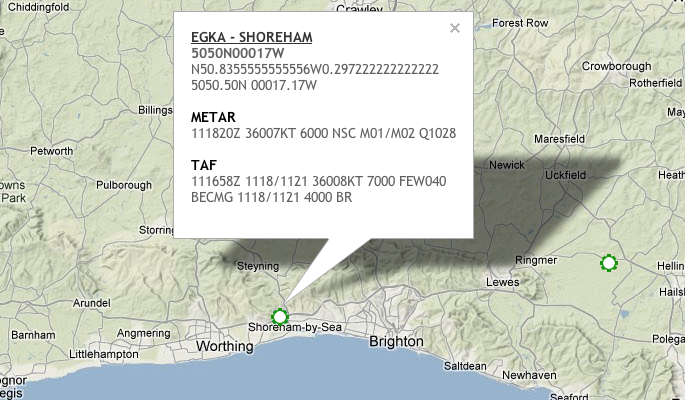
TAF EIDW 110500Z 1106/1206 13010KT 9000 BKN010 BECMG 1106/1108 BKN018 PROB30 TEMPO 1108/1116 17025G40KT 4000 TSRA BKN012CB BECMG 1118/1121 3000 BR NSC=
TAF Decode:
- Twenty four-hour TAF issued at 0500 UTC on the 11th
- Dublin valid from 0600hrs on the 11th to 0600hrs on the 12th
- Wind 130 degrees ten knots
- Nine kilometres visibility
- Broken at 1000 feet
- Becoming from 0600hrs on the 11th to 0800hrs on the 11th
- Broken at 1800 feet
- 30% probability, temporarily between 0800hrs on the 11th to 1600hrs on the 11th
- Wind 170 degrees 25 knots, gusting to 40 knots
- 4000 metres visibility
- Thunderstorm with moderate rain
- Broken cumulonimbus at 1200 feet
- Becoming from 1800hrs on the 11th to 2100hrs on the 11th, 3000 metres visibility, mist, no significant cloud
TAF Decodes
| Code Element | Example | Decode | Notes |
|---|---|---|---|
| Report type | TAF | ‘Terminal Aerodrome Forecast’ | Name for an aerodrome forecast |
| Location | EIDW | "Dublin" | Station four-letter ICAO indicator |
| Date/Time of origin Zulu is equivalent to UTC | 130500Z | ‘For the 13th at 0500hrs Zulu’ | |
| Validity time | 1306/1406 | ‘Valid from 0600hrs on the 13th to, 0600hrs on the 14th | UTC (Greenwich Mean Time) |
| Wind | 31015G25KT | ‘310 degrees, 15 knots, max twenty five knots’ | VRB = Variable; 00000KT = calm. Wind direction is given in degrees true |
| Prevailing visibility or CAVOK* | 8000 | ‘Eight kilometres’ | 9999 = 10 km or more; 0000 = less than 50 metres |
| Significant weather | -SHRA | ‘Light rain showers’ | NSW = No significant weather |
| Cloud | FEW005 SCT010 SCT018CB BKN025 | ‘Few at five hundred feet, scattered at one thousand feet, scattered cumulonimbus at one thousand eight hundred feet. Broken at two thousand five hundred feet’ | FEW = 1-2 oktas; SCT = 3-4 oktas; BKN = 5-7 oktas; OVC = 8 oktas; ‘VV///’ = state of sky obscured (cloud base not discernible); figures in lieu of ‘///’ give forecast vertical visibility in hundreds of feet. NSC = no significant cloud (none below 5,000 feet and no TCU or CB) TCU and CB will be the only cloud types specified. Cloud heights are given in feet above airfield height. |
| Significant changes Probability Time Change indicator Met. groups | PROB30 1314/1316 BECMG 1314/1316 FM131400 TSRA BKN010CB | ‘30% probability’ ‘from 1400hrs on the 13th to 1600hrs on the 13th,’ or ‘becoming from 1400hrs on the 13th to 1600hrs on the 13th’ or ‘from 1400hrs on the 13th’ followed by ‘Thunderstorm with rain, broken cumulonimbus at 1000 feet’ | Only 30% or 40% probability will be used. Indicates beginning and end time of forecast period in UTC. Also TEMPO = temporarily may be used. Met. group follows indicating a change in some or all of the elements forecast in the first part of the TAF. |
* CAVOK will replace visibility and cloud groups.
Other abbreviations that you may come across are listed below:
- + = Heavy (well developed in the case of +FC and +PO)
- – = Light
- no qualifier = Moderate
- BC = Patches
- BECMG = Becoming
- BL = Blowing
- BR = Mist
- CAVOK = Visibility greater or equal to 10 km, no cumulonimbus or towering cumulus, no cloud below5,000 ft or highest minimum sector altitude (MSA) (whichever is the greater) and no weather significant to aviation.
- DR = Drifting
- DS = Duststorm
- DU = Dust
- DZ = Drizzle
- FC = Funnel cloud
- FG = Fog
- FU = Smoke
- FZ = Freezing
- GR = Hail (>5 mm)
- GS = Small hail or snow pellets
- HZ = Haze
- IC = Ice crystals
- MI = Shallow
- PL = Ice pellets
- PO = Dust devils
- PR = Banks
- RA = Rain
- SA = Sand
- SH = Showers
- SG = Snow grains
- SN = Snow
- SQ = Squalls
- SS = Sandstorm
- TS = Thunderstorm
- VA = Volcanic ash
- VC = In vicinity
Basic Autorotations
(Updated on 28th March 2021)
 During your helicopter training, you will eventually have to learn how to glide the helicopter in unpowered flight. All helicopters can glide. We call it “autorotation“. We practice autorotations so much in the course of training that they become a part of normal helicopter flight. But do not think that autorotations are common in real life. Engine failures are extremely rare and tail rotor failures are even rarer. So how do we do a basic autorotation?
Your instructor will probably do all the throttle work as you will not have to use the throttle in a real emergency. Check with your instructor as to what the verbal warning will be before commencing an autorotation.
Basic Autorotations
- Make sure that you are in straight and level flight. 80 knots and 2000 feet above ground level (agl) is a good starting point. Look outside at the horizon and make sure that you take note of where it appears to cut through the windscreen (your reference point). When you perform part 2 in this list, count to 3 before you look inside at any of the instruments.
- Lower the collective lever fully down. This is the most important thing to do in any autorotation. When you feel the collective hit the bottom stop, raise it up again approximately 2.5cm (1″) to prevent a rotor over-speed. As you lower the collective lever, the nose of the helicopter will try to drop due to the change in airflow over the tailboom. This must be prevented by use of the cyclic. The nose will also try to yaw dramatically to the left (in most helicopters – check with your instructor). Prevent this by adjusting the pedals.
- As mentioned in 2 (above), as you lower the collective, the nose will drop. We do not want this to happen. In fact, we normally want to make the nose come up a little bit to help restore rotor RPM. Therefore you need to come sufficiently aft with the cyclic to achieve a nose up attitude. This will also slow the helicopter down to autorotation speed (normally 60 – 70 knots).
- As the nose yaws left, put in sufficient right pedal to keep the helicopter pointed straight ahead. This requires a lot of right pedal due to the large reduction in torque. If you have done this correctly, the helicopter should remain in trim (balance). NOW YOU CAN LOOK AT THE INSTRUMENTS inside.
- We are only interested in 3 instruments:
- The Air Speed Indicator (ASI)
- The tachometer for rotor RPM
- The slip indicator.
The main thing to remember is that you should not look inside as you are moving all of the controls. Look outside and count to 3 after you feel the collective hit the bottom stop. As long as you keep the helicopter speed steady, the rotor RPM will also remain steady. If you find that you are doing 90 knots and you should be at 60 knots, smoothly move the cyclic aft to reduce the speed. If you do this quickly, you could over speed the rotor system. Also, if you find the speed has reduced to 50 knots, smoothly move the cyclic forward to increase speed. If you do this quickly, you may get a rotor underspeed. Do not chase the needles. Look outside at the horizon to maintain your attitude and thereby maintain your air speed.Remember that when you move the collective, it takes about 3 seconds for the rotor RPM to change. If the low RPM warning horn or light comes on, lower the collective slightly and check that the RPM is recovering.
Basic Autorotation Recovery
To recover, your instructor will open the throttle and provide power to the rotor system. He will tell you when to begin the recovery. To commence the recovery, smoothly raise the collective up until you reach the normal climb setting for your type of helicopter. Check the temperatures and pressures. Make sure there is NO traffic around you (especially above you). With a little practice you will find that you will become quite proficient at basic autorotations.
EASA Air Law For The PPL
(Updated on 28th March 2021)
Under EASA regulations, the syllabus for the Air Law theory for PPL students has changed considerably. All of these changes have required Approved Training Organisations to rewrite their training material. To date, there are no books to teach the new EASA regulations in Ireland.
For this reason, I have written a book specifically for PPL students (fixed wing and rotary) to give them the required knowledge to pass the EASA Aviation Law examination. The book covers everything listed in the EASA requirements for this subject.
For a FREE PREVIEW – Click Here
Please leave a review if you get a chance as it will really help me sell the book. Reviews really make a difference and I would be very grateful.
“EASA Air Law For The PPL – Air Law For The Irish Pilot” can be purchased using the link below: