Basic Autorotations
(Updated on 28th March 2021)
 During your helicopter training, you will eventually have to learn how to glide the helicopter in unpowered flight. All helicopters can glide. We call it “autorotation“. We practice autorotations so much in the course of training that they become a part of normal helicopter flight. But do not think that autorotations are common in real life. Engine failures are extremely rare and tail rotor failures are even rarer. So how do we do a basic autorotation?
Your instructor will probably do all the throttle work as you will not have to use the throttle in a real emergency. Check with your instructor as to what the verbal warning will be before commencing an autorotation.
Basic Autorotations
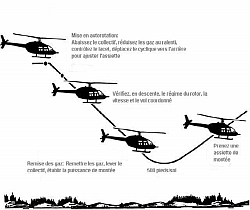
- Make sure that you are in straight and level flight. 80 knots and 2000 feet above ground level (agl) is a good starting point. Look outside at the horizon and make sure that you take note of where it appears to cut through the windscreen (your reference point). When you perform part 2 in this list, count to 3 before you look inside at any of the instruments.
- Lower the collective lever fully down. This is the most important thing to do in any autorotation. When you feel the collective hit the bottom stop, raise it up again approximately 2.5cm (1″) to prevent a rotor over-speed. As you lower the collective lever, the nose of the helicopter will try to drop due to the change in airflow over the tailboom. This must be prevented by use of the cyclic. The nose will also try to yaw dramatically to the left (in most helicopters – check with your instructor). Prevent this by adjusting the pedals.
- As mentioned in 2 (above), as you lower the collective, the nose will drop. We do not want this to happen. In fact, we normally want to make the nose come up a little bit to help restore rotor RPM. Therefore you need to come sufficiently aft with the cyclic to achieve a nose up attitude. This will also slow the helicopter down to autorotation speed (normally 60 – 70 knots).
- As the nose yaws left, put in sufficient right pedal to keep the helicopter pointed straight ahead. This requires a lot of right pedal due to the large reduction in torque. If you have done this correctly, the helicopter should remain in trim (balance). NOW YOU CAN LOOK AT THE INSTRUMENTS inside.
- We are only interested in 3 instruments:
- The Air Speed Indicator (ASI)
- The tachometer for rotor RPM
- The slip indicator.
The main thing to remember is that you should not look inside as you are moving all of the controls. Look outside and count to 3 after you feel the collective hit the bottom stop. As long as you keep the helicopter speed steady, the rotor RPM will also remain steady. If you find that you are doing 90 knots and you should be at 60 knots, smoothly move the cyclic aft to reduce the speed. If you do this quickly, you could over speed the rotor system. Also, if you find the speed has reduced to 50 knots, smoothly move the cyclic forward to increase speed. If you do this quickly, you may get a rotor underspeed. Do not chase the needles. Look outside at the horizon to maintain your attitude and thereby maintain your air speed.Remember that when you move the collective, it takes about 3 seconds for the rotor RPM to change. If the low RPM warning horn or light comes on, lower the collective slightly and check that the RPM is recovering.
Basic Autorotation Recovery
To recover, your instructor will open the throttle and provide power to the rotor system. He will tell you when to begin the recovery. To commence the recovery, smoothly raise the collective up until you reach the normal climb setting for your type of helicopter. Check the temperatures and pressures. Make sure there is NO traffic around you (especially above you). With a little practice you will find that you will become quite proficient at basic autorotations.
Did you enjoy this post? Why not leave a comment below and continue the conversation, or subscribe to my feed and get articles like this delivered automatically to your feed reader.


Hi John,
Thank you so much for putting so much effort in to your blog. The information is great and I was wondering if you could post some details of the best way to achieve the CPL H JAR.
Many thanks.
Kevin